
Content Hub
Plan, write and publish articles, listicles and other content from briefs, with AI generation grounded in your product catalog.
The Content Hub is where you plan, write and publish content that sits above your product pages: listicles, buying guides, articles and other formats. Each piece starts as a brief, is written from your catalog and brand, and is published from your store or sent to a webhook.
Looking for AI Search or Decks?
Both used to be described on this page. They now have their own guides:
- AI Search: flows, prompts, AI engines, runs, the five results pages, findings, playbooks and the project Summary.
- Decks: building, presenting and downloading presentations, and deck templates.
Find your way around
Open Content Hub in the sidebar, under Grow. It is available on Shopify, WooCommerce and "Feeds and files" projects.
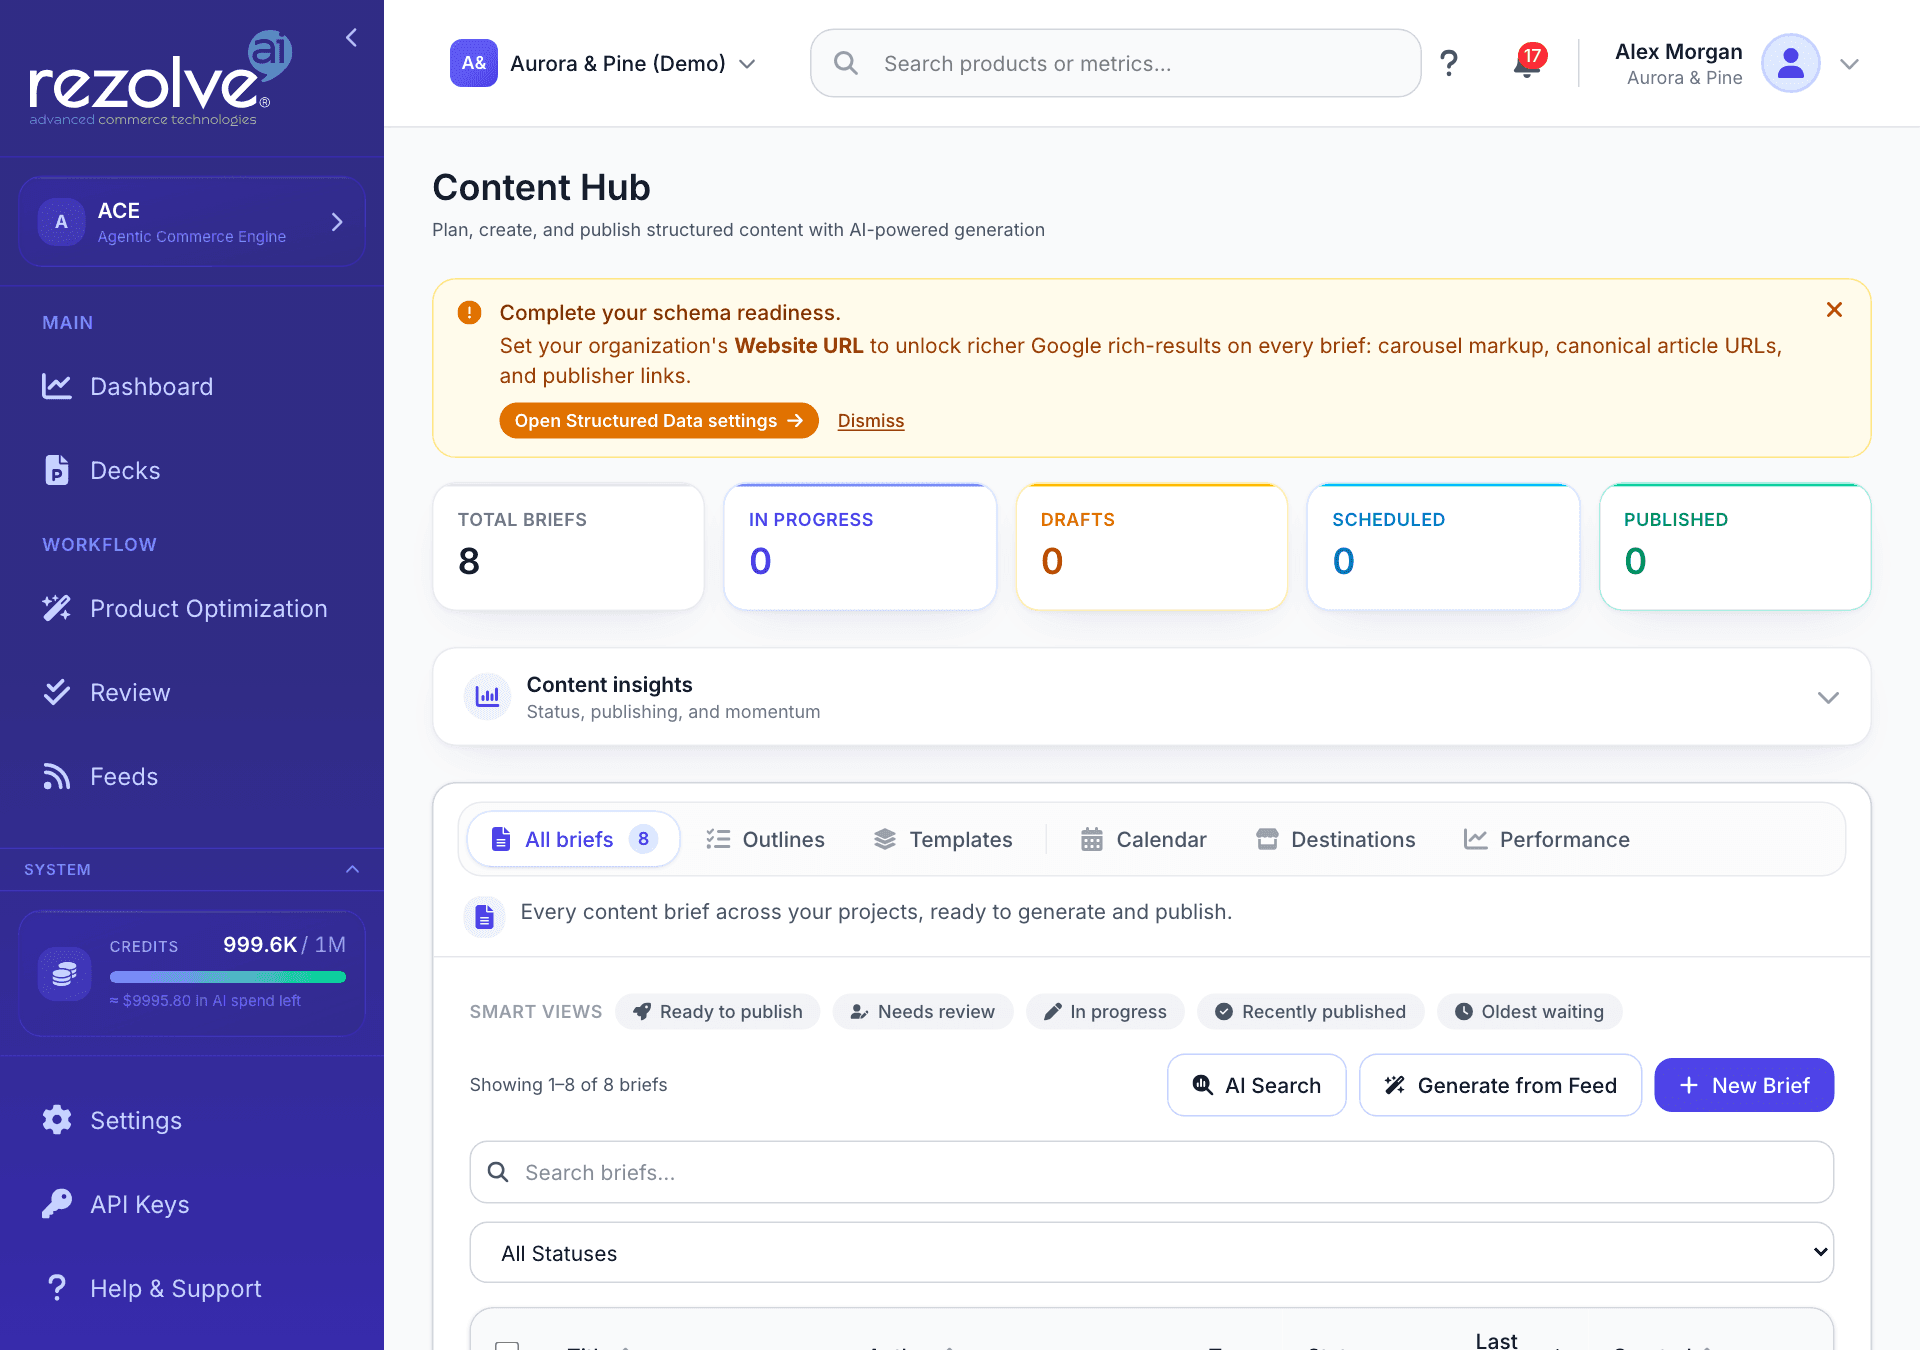
The top of the page shows five counts (Total briefs, In progress, Drafts, Scheduled and Published) and a Content insights panel with the status distribution, content formats and what was published in the last 14 days. Below that are six sections:
| Section | What it is for |
|---|---|
| All briefs | Every brief you have created in this project. Create, generate and publish from here. |
| Outlines | Structured build guides that tell a writer what each part of a piece should contain. |
| Templates | Your content types and reusable block templates. |
| Calendar | What is scheduled to publish and when. |
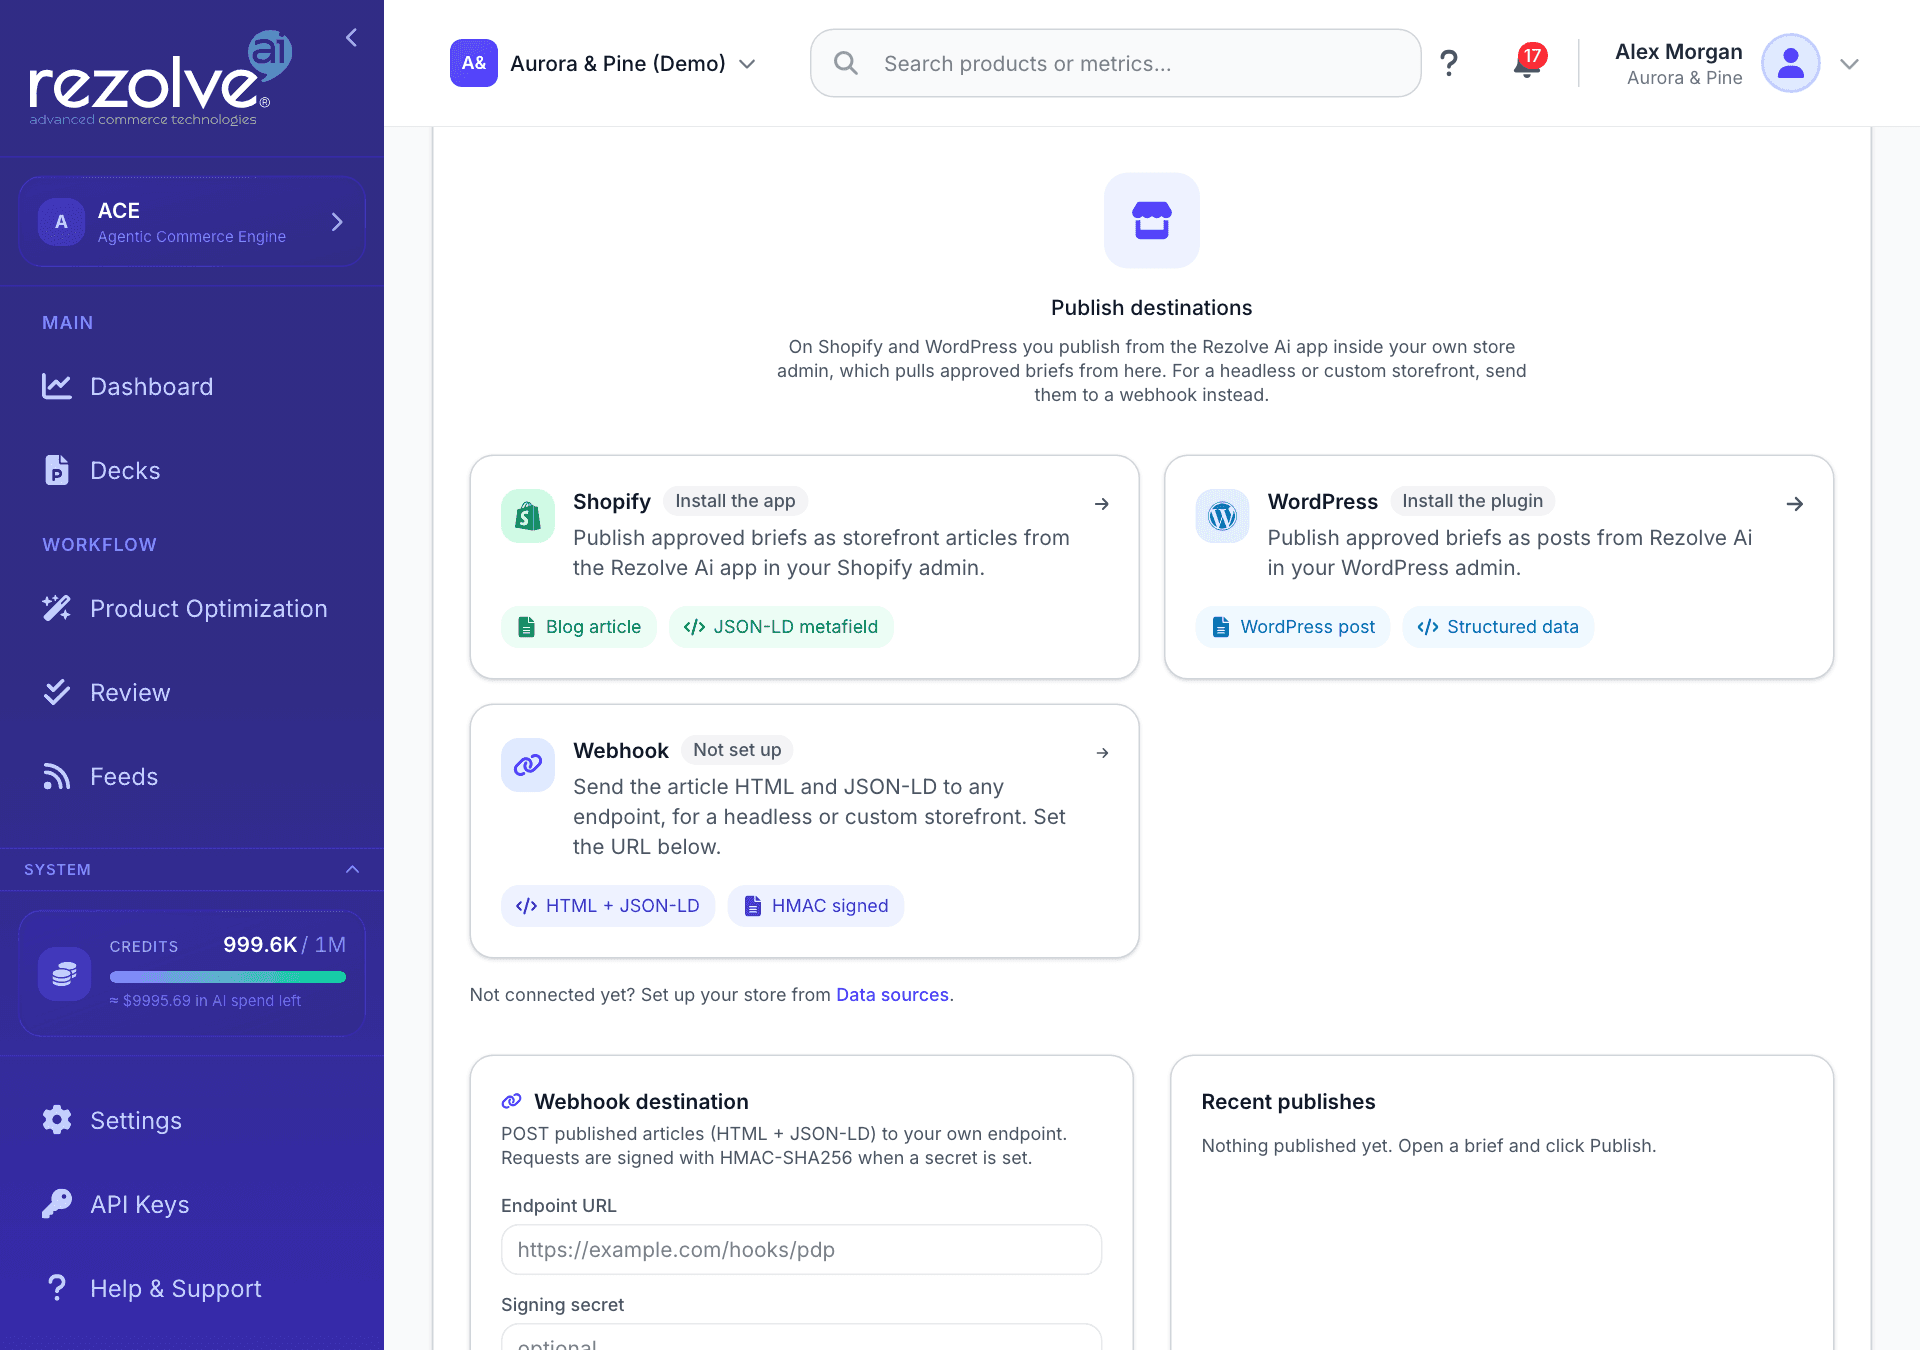
| Destinations | Where finished briefs go: your Shopify or WordPress store app, or a webhook. |
| Performance | Views on your published content. |
What a brief is
A brief is the plan for one piece of content, and it holds the finished article too. It has:
- A title and a status.
- A content type, which decides the shape of the piece.
- Brief sections that give the direction: Overview, Target Personas, Key Questions, Competitive Analysis, Content Checklist and Content Architecture.
- An outline, the products it features, and the article itself.
A new brief starts as Waiting to be picked up. You change the status yourself in the brief editor, and publishing sets it to Published.
| Status | Meaning |
|---|---|
| Waiting to be picked up | Created, with no work started. |
| Work in progress | Being written. |
| With editor | Waiting for someone to review it. |
| Draft | Finished and ready to publish. Only a Draft can be published. |
| Published | Live. |
Create briefs
There are three ways to start a brief.
One at a time
- In All briefs, choose New Brief.
- Enter a title and choose Create. The brief opens in the editor.
From your catalog, several at once
- In All briefs, choose Generate from Feed.
- Tick the product categories to write about, describe a Theme or Direction (for example a season or a budget), or do both.
- Choose Generate Ideas. Each idea comes with an angle, such as Roundup, Comparison, Buying Guide, Seasonal, Trend Analysis, How-To, Cross-Category or Problem / Solution, and the audience it is for.
- Tick the ideas you want and choose the create button, which shows how many briefs it will make.
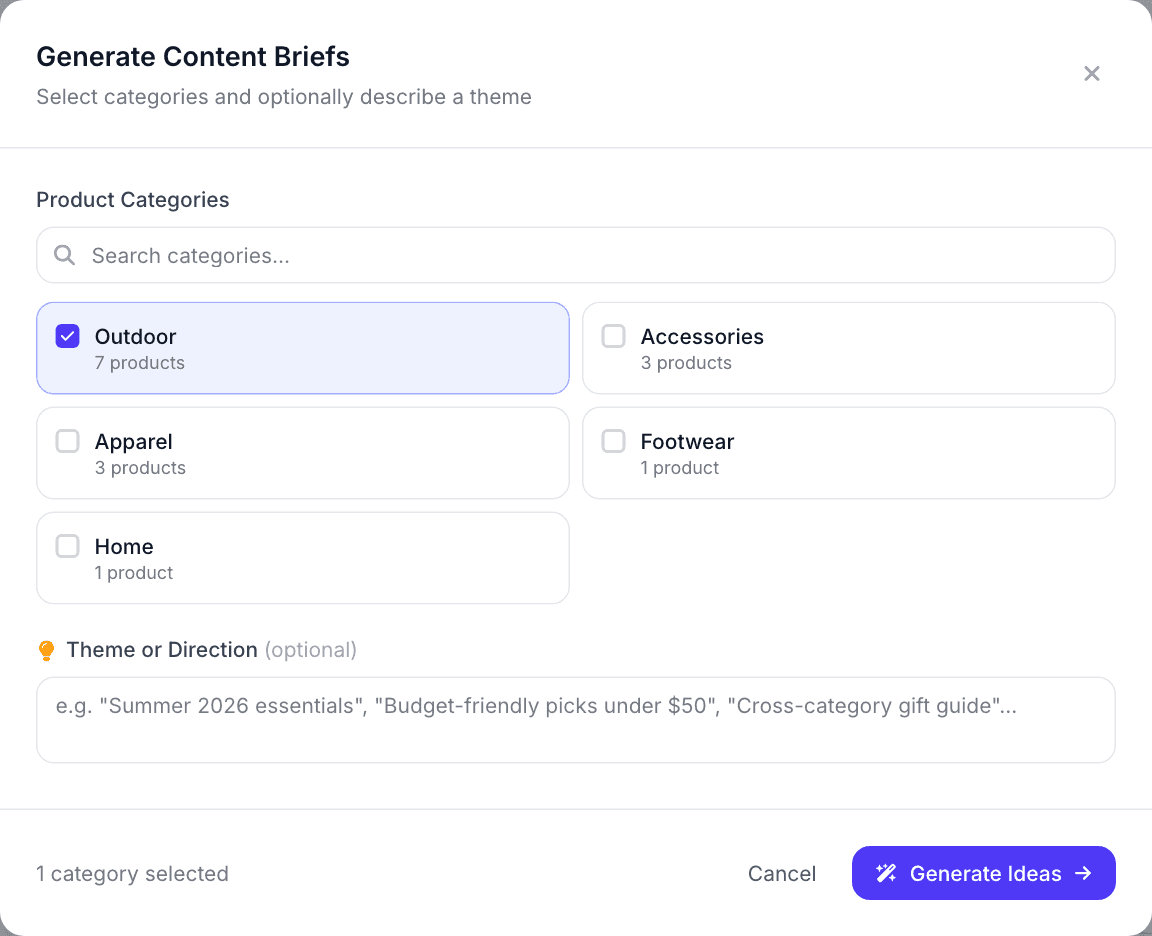
Generating ideas uses credits. Creating the briefs from them does not.
From AI Search research
In AI Search, under Actions, Playbooks, a playbook can be turned into a brief or an outline with its sections already filled in from the research. See Playbooks.
Work with the brief list
- Smart views apply a status and a sort in one click: Ready to publish, Needs review, In progress, Recently published and Oldest waiting.
- Search by title, filter by status, and filter by tag when your briefs carry tags. Sort by title, author, last updated or created date.
- Tick briefs to act on several at once: Generate, Tag, Export (a CSV file), Publish and Delete. Publish applies only to the selected briefs that are set to Draft. Deleting is permanent.
Generate articles in bulk
Tick the briefs and choose Generate. Up to 25 briefs can be generated at once.
- Each brief uses its own linked products, content type and settings.
- A brief with no outline gets one written first.
- Credits are charged for each article as it is written.
- Briefs that already have content are skipped unless you tick Also regenerate briefs that already have content.
Articles are written in the background, so you can leave the page. A panel in the corner shows what is being written and what has finished.
The brief editor
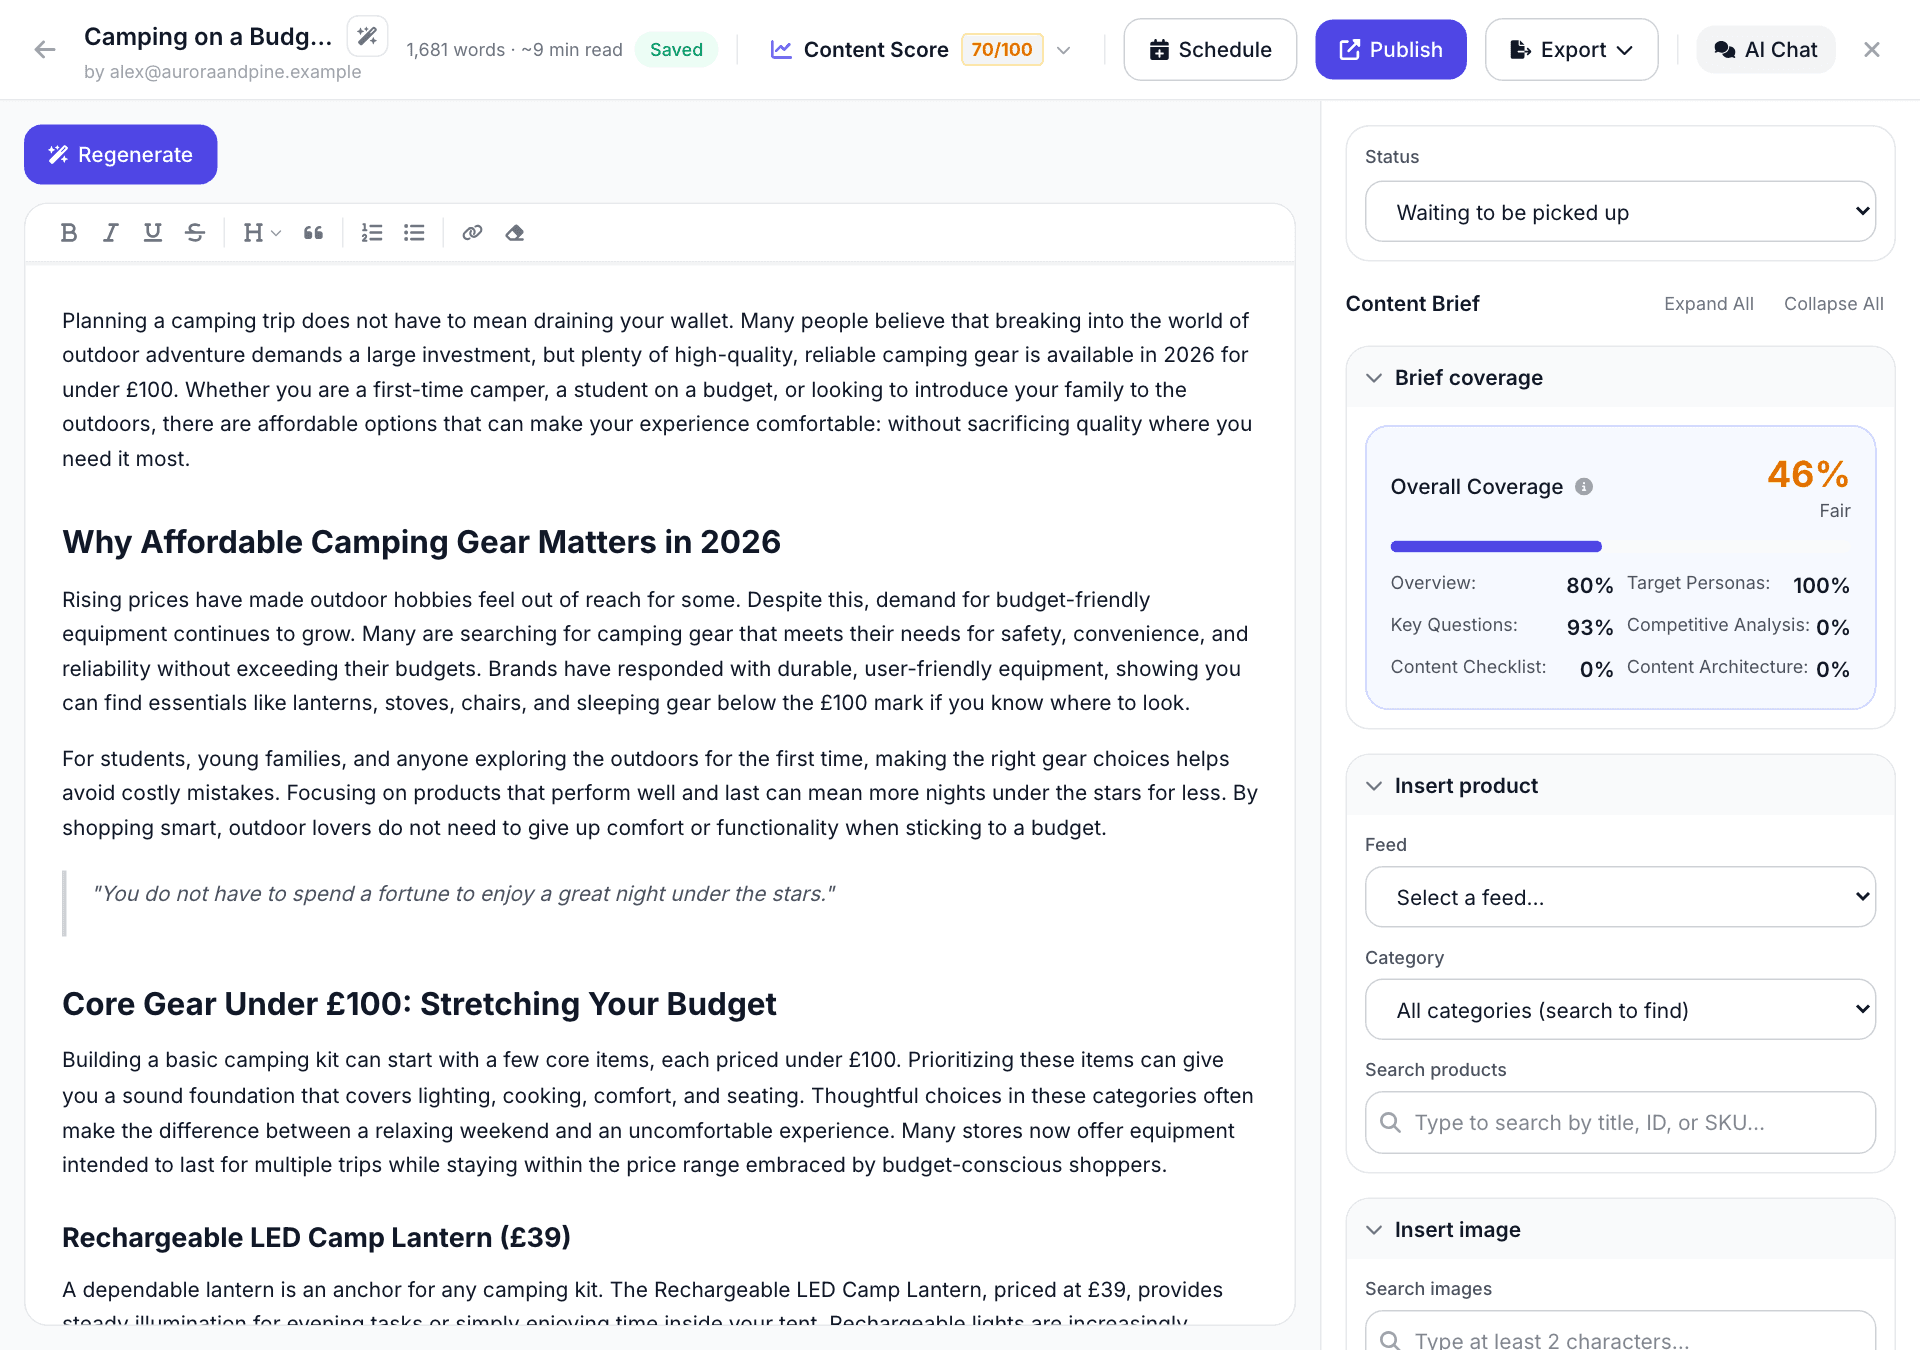
Open a brief to edit it. The bar at the top holds the title, the content type, the word count and reading time, and whether your changes are saved. Changes are saved as you work. To its right are Content Score, Schedule, Publish, Export and AI Chat.
Generate the article
A new brief shows Generate Content and Write manually. Generate Content opens a guided workflow:
| Step | What you do |
|---|---|
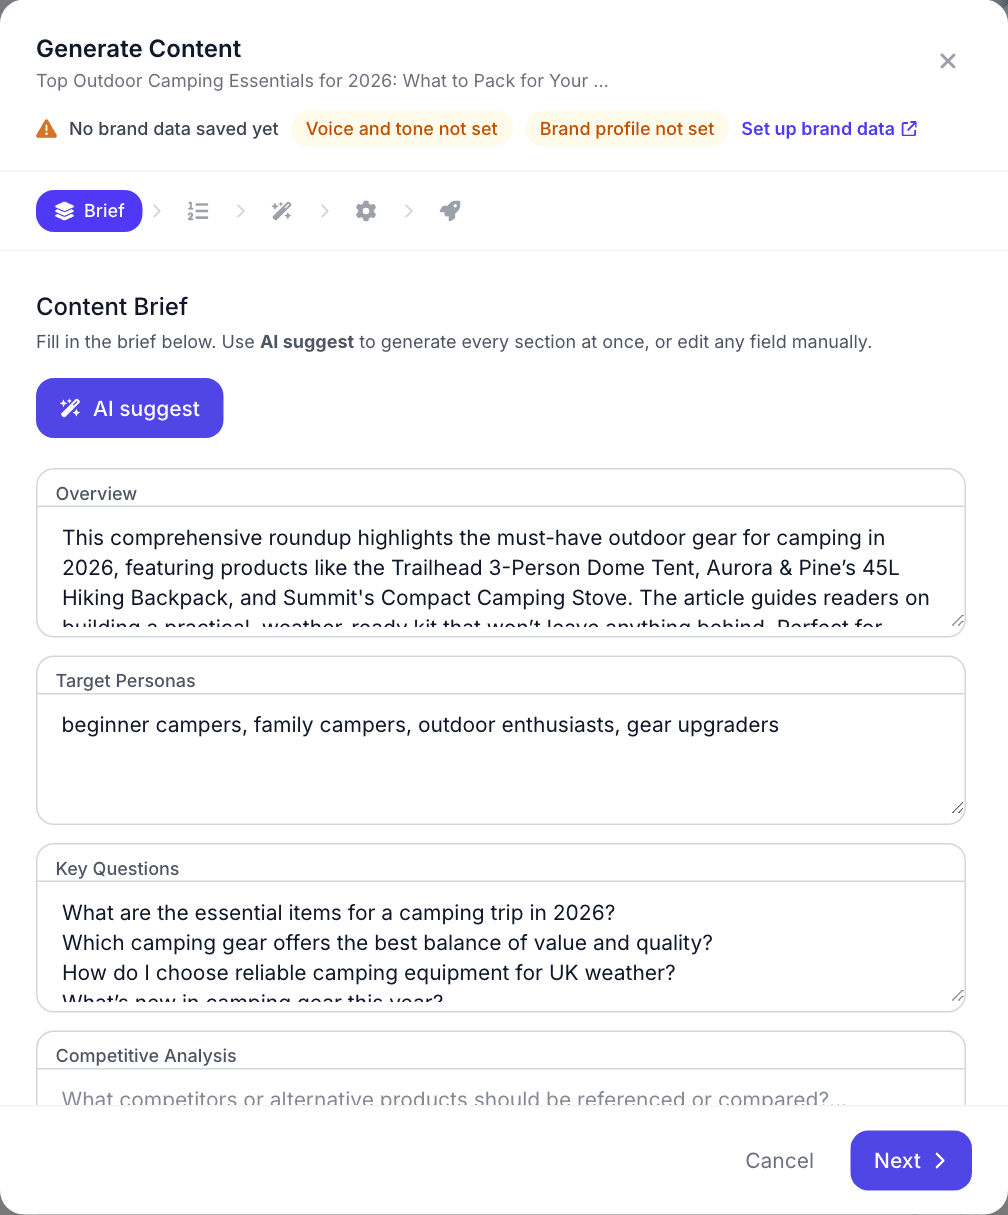
| Brief | Fill in the six brief sections, or choose AI suggest to have all of them written at once. |
| Outline | Choose Generate outline with AI, or write your own. The outline sets the structure of the article. |
| Enrichment | Add Consumer Criteria, Product Context, Use Cases and Purchase Occasions, or choose Enrich all with AI. |
| Configuration | Choose the content type, target persona, tone, content style, language and word count. |
| Select products | Tick Include products from your catalog, pick the products and set their order. A content type that is written about a whole category asks for a Target Category in the Configuration step instead, and skips this step. |
| Generate | Review the summary and choose Generate Content. |
The article is written in the background, so you can close the window or leave the page. A banner in the editor shows the stage it has reached (planning the outline, writing, adding internal links, saving, building schema markup) and offers Cancel. When it finishes, the article is saved to the brief.
To start again, choose Regenerate. To write the piece yourself, choose Write manually and type in the editor.
Edit and improve
- The editor. Format the article with headings, bold, italic, lists, quotes and links.
- Title suggestions. The button beside the title suggests alternative titles. Choose Use this title to apply one.
- AI Chat. Ask about the whole article or select a passage first. Quick actions include Improve readability, Make more SEO-friendly and Expand this section. When the assistant proposes new text, choose Apply Suggestion to put it in the article, and Revert to take it back.
- Content Score. Scores the article on SEO, readability, structure, engagement and keywords, with suggestions for the weak areas. Choose Score now to score it again.
The sidebar holds the rest:
| Panel | What it does |
|---|---|
| Status | Sets the brief's status. |
| Brief coverage | Shows how much of each brief section the article reflects. Improve with AI revises the article to cover what is missing. |
| Insert product | Finds a product in your feeds and inserts it into the article as a product block, with its details, images and link. |
| Insert image | Searches stock photos by keyword, orientation and color, and inserts one with its credit. |
| Product refresh | Keeps the products in a guide up to date with your catalog on a schedule you choose. Check now runs it once. |
| Schema markup | The structured data for the article. See Schema readiness and rich results. |
| Translations | Generates the article in another language. Translations run in the background. |
Copy and download
Export copies or downloads the article:
- Copy as Text, Copy as HTML, Copy JSON-LD script and Copy as Markdown.
- Download as Text, Download as HTML, Download schema.json, Download as Markdown and Download as XML.
Content types
The content type decides the structure, tone and length of a piece. You choose it in the Configuration step of the workflow, from four groups:
- Your content types: the types you have created.
- Preset types: ready-made formats beyond articles, such as a press release, an email newsletter, a video script, an FAQ page, landing page copy and product page content.
- Your block templates: the block structures you have built. See Block templates.
- System layouts: the built-in article layouts.
The system layouts are Ranked List, Grid Showcase, Comparison Guide, Category Roundup, How-To Guide, Buying Guide, Editorial, Listicle Article, Product Review, Product Spotlight and Seasonal Campaign.
Some types set their own product rules when products are included. A listicle layout needs at least 5 products, a Comparison Guide takes 1 to 4, and your own content types can set a minimum and a maximum.
Create your own content type
- Open Templates and, under Content types, choose New content type.
- Describe what you need in a sentence or two and choose Draft with AI. The whole type is drafted for you: structure, tone, length and format. Or choose Start from a blank form instead.
- Check the fields: name, description, structure guide, output format, length, default tone and audience, whether products are on by default, and the building blocks the format uses.
- Choose Create content type.
To start from a ready-made format, choose Duplicate and customize on any entry in the Preset library. Drafting a type with AI uses credits.
Block templates
A block template is a reusable structure made of content blocks, such as headings, paragraphs, product cards, comparison tables, pros and cons, callouts and FAQs. It is applied on top of a content type.
- Open Templates and choose New Template.
- Name it, choose a Base layout, and add blocks from the Block types list. Drag them into order.
- Select a block to set its options under Block settings.
- Choose Create template.
A template can hold up to 50 blocks. Existing templates can be edited, duplicated or deleted from the same section.
Outlines
An outline is a build guide: a step-by-step plan for writing a piece, with the heading, instructions, word limits, keywords, featured products and a checklist for each step. Use one when a person, not the AI, will write the piece, or when you want to agree the structure first.
- Open Outlines and choose New Outline. Enter a title.
- Choose Build guide. The same workflow as for a brief collects the outline, enrichment, configuration and products, then drafts the guide.
- Edit any step, reorder steps, or add your own.
- Copy the guide as Markdown, download it as Markdown or HTML, or print it.
Regenerate guide drafts it again. Building a guide uses credits.
Calendar and scheduling
Calendar shows scheduled publishes by month, or as a list split into Upcoming, Published and Needs attention.
To schedule a brief, choose Schedule a brief in the calendar and pick the brief, or choose Schedule in the brief editor. Set Publish at to a date and time in the future (times are in your local timezone) and choose Schedule.
Open a scheduled item to Reschedule it or to Cancel publish.
Scheduling from Rezolve Ai delivers the article to your webhook, so set one up in Destinations first. If the calendar says scheduled publishing is paused, you can still plan, reschedule and cancel, but nothing is sent until it is switched back on.
Destinations and publishing
A finished brief can reach your site in three ways. Destinations lists all three and shows which are set up.
| Destination | How publishing works |
|---|---|
| Shopify | You publish from the Rezolve Ai app inside your Shopify admin. The app lists the briefs that are ready and publishes one as a blog article with its structured data. See Shopify app. |
| WordPress | You publish from Rezolve Ai inside your WordPress admin, as a post with its structured data. See WordPress plugin. |
| Webhook | Rezolve Ai sends the article HTML and its JSON-LD to an endpoint you choose. Use this for a headless or custom storefront. |
For Shopify and WordPress, set the brief to Draft when it is ready. The app in your store then lists it as Ready to publish.
To publish to a webhook:
- Open Destinations. Under Webhook destination, enter the Endpoint URL and, if you want requests signed, a Signing secret. Choose Save.
- Set the brief's status to Draft.
- In the brief editor, choose Publish, then Publish again in the dialog. To send several, tick them in the list and choose Publish.
Recent publishes on the Destinations section lists each attempt with its time and outcome, and a link to the article when the destination returns one.
Performance
Performance shows how your published content is read, over the last 7, 30 or 90 days: Views with the change against the previous period, Avg time on page, Bounce rate and a chart of views over time.
Views are counted once a brief is published and readers start visiting it. Clicks, conversions and revenue are not shown.
Schema readiness and rich results
Every brief carries JSON-LD structured data (Article, ItemList, and more depending on the layout) so published content is eligible for Google rich results. You can see and edit it in the Schema markup panel of the brief editor. A few things to know:
- Schema.org Validator and Google Rich Results Test are different checks. The Schema.org validator only checks that your JSON is well-formed against the vocabulary. Google's Rich Results Test is stricter. For example, every item in a carousel (ItemList) must have either a
urlor a nesteditem. Test with Google before you publish: Test in Google in the Schema markup panel copies your JSON-LD and opens the tool. - Listicle fallbacks. When a linked product has a page URL, the list item carries that
url. When it does not, the list item carries a nesteditemwith the product's name, image and brand, so the markup stays valid for Google's carousel. - Website URL. Set your organization's Website URL under Settings, Structured Data. It is used as the publisher URL on every Article and to build the article's canonical address when a brief has no article URL of its own. The Content Hub shows a reminder at the top until it is set or you dismiss it.
Global JSON-LD defaults (organization, logo, author, brand, locale) are set once under Settings, Structured Data and fill in every brief, so you do not retype them.
Internal linking
When internal linking is switched on, links to relevant products and pages are added to an article as it is generated. You can review and edit them in the editor before publishing. Set it up under Settings, Internal Linking, and see the Internal Linking guide for details.
What uses credits
| Action | Credits |
|---|---|
| Generating brief ideas with Generate from Feed | Uses credits |
| Filling brief sections, generating an outline, and enriching with AI | Uses credits |
| Generating an article, one at a time or in bulk | Uses credits, charged for each article |
| Building an outline's guide | Uses credits |
| AI Chat, title suggestions and Improve with AI | Uses credits |
| Generating schema markup with AI, and AI alt text for an image | Uses credits |
| Translations | Uses credits |
| Drafting a content type with AI | Uses credits |
| Creating a blank brief, editing by hand, exporting, scheduling and publishing | No credits |
Quick links
Field Formats
Rezolve Ai writes new content the way your store already writes each field, or in a preset you choose, and can fill fields that are empty.
Internal Linking
Add AI-suggested internal links to Content Hub articles and product pages, place them inside your copy, and choose where product links appear.